Introduction
3D printing has revolutionized the way we create custom models, with flexible prints becoming increasingly popular. One of the most exciting applications of flexible 3D printing is creating a 3D print Tiger Flexy—a highly detailed, articulated, and flexible tiger model. Whether for collectors, kids’ toys, or artistic creations, Flexy Tigers are an impressive way to showcase the capabilities of your 3D printer. This guide will walk you through everything you need to know about 3D printing a flexy tiger, including materials, settings, design considerations, and troubleshooting tips.
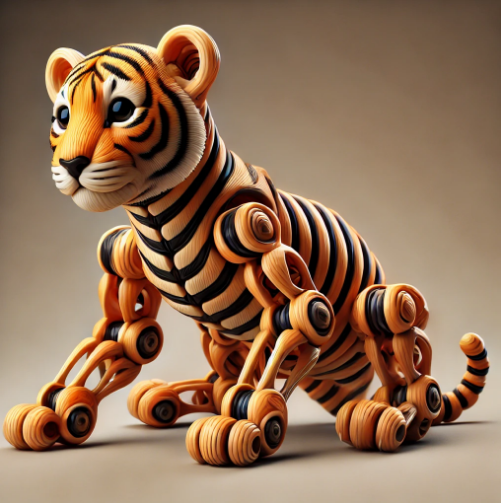
What Is a 3D Print Tiger Flexy?
A 3D print Tiger Flexy is an articulated, flexible tiger model printed using a 3D printer. Unlike rigid models, flexy prints feature movable joints or interlocked segments, allowing them to bend and move smoothly. These prints are popular for their fun, interactive nature and their ability to showcase the precision of 3D printing.
Why Choose a Flexy 3D Print?
1. Flexible and Realistic Motion
Both toy aficionados and painters would find flexible models perfect as they permit lifelike movement.
2. Strength and Durability
Flexible filaments like TPU (thermoplastic polyurethane) printed with will help the model resist bending and stretching without breaking.
3. Aesthetic Value
Flexy tigers may be amazing display items with their smooth articulation and detailed work.
4. Educational and Fun
Great for teaching kids about 3D printing and mechanics, as they get to play with a model that moves like a real tiger.
Best Materials for Printing a Flexy Tiger
Choosing the right material is crucial for getting the best results. Below are the most commonly used filaments:
1. TPU (Thermoplastic Polyurethane)
- Best for high flexibility and durability
- Can stretch and bend without breaking
- Works best with a direct drive extruder
2. TPE (Thermoplastic Elastomer)
- Offers superior elasticity
- Provides a rubber-like texture
- Requires careful tuning of print settings
3. PLA with Flex Additives
- Not as flexible as TPU but easier to print
- A good middle-ground option for hobbyists
- Retains structure while offering slight flexibility
Recommended Print Settings for a Flexy Tiger
For the best results, follow these recommended settings:
- Layer Height: 0.2 mm for detailed prints
- Print Speed: 20-40 mm/s (flexible filaments print slower)
- Infill Density: 10-20% (higher infill can affect flexibility)
- Temperature Settings:
- TPU: 210-230°C (hot end), 60°C (bed)
- TPE: 220-240°C (hot end), 50-60°C (bed)
- Cooling Fan: 50% to improve bridging and reduce stringing
Step-by-Step Guide to 3D Print a Tiger Flexy
Step 1: Choose or Design Your Model
You can download a ready-made Flexy Tiger model from platforms like Thingiverse, Cults3D, or MyMiniFactory, or create your own using 3D modeling software such as Blender or Fusion 360.
Step 2: Prepare Your Printer and Filament
- Ensure your printer is calibrated for flexible filaments.
- Use a direct drive extruder if possible for better control over soft filaments.
- Adjust the retraction settings (usually lower retraction for TPU to avoid clogging).
Step 3: Slice the Model
- Use slicing software like Cura, PrusaSlicer, or Simplify3D.
- Enable coasting and combing to minimize stringing.
- Set a low print speed to avoid extrusion issues.
Step 4: Start the Print
- Monitor the first few layers to ensure adhesion.
- Consider using a brim or raft for better bed adhesion.
Step 5: Post-Processing and Finishing
- Carefully remove supports if used.
- Trim any stringing with a sharp blade.
- For smoother finishes, consider heat treatment with a heat gun.
Common Issues and Troubleshooting
1. Stringing and Oozing
- Solution: Lower printing temperature and increase retraction settings.
2. Poor Bed Adhesion
- Solution: Use a heated bed and apply a glue stick or painter’s tape.
3. Under-Extrusion
- Solution: Print slower and ensure the extruder gear grips the filament properly.
4. Print Sticking to the Nozzle
- Solution: Increase nozzle height slightly and clean the nozzle regularly.
READ MORE – 3D Print Small Meth Bong: Legal, Ethical, and Practical Considerations
FAQs:
1. Printing a flexy tiger requires what kind of filament?
TPU is the ideal filament for a flexy tiger since it guarantees smooth movement in articulated joints using its resilience and great flexibility.
2. Using a Bowden extruder, can I print a flexy tiger?
Though finer control over flexible filaments like TPU depends on a direct drive extruder, it is feasible.
3. How long does it take to print a flexy tiger?
Depending on the size and print settings, it can take 6-12 hours on average.
4. How do I reduce stringing in flexible filament prints?
To reduce stringing, lower the print temperature, increase retraction, and enable combing mode in the slicer.
5. Where can I find high-quality Flexy Tiger models?
You can find models on platforms like Thingiverse, Cults3D, or MyMiniFactory. Always check the model’s rating and user reviews before downloading.
Conclusion:
Creating a 3D print. Whether you’re a hobbyist or a professional, Tiger Flexy is an interesting and satisfying experience. Using the correct tools, materials, and troubleshooting methods will produce a remarkably finely detailed, completely expressive tiger model. Try several patterns and approaches to improve your printing abilities and realize your flexy tiger!


